Lawn
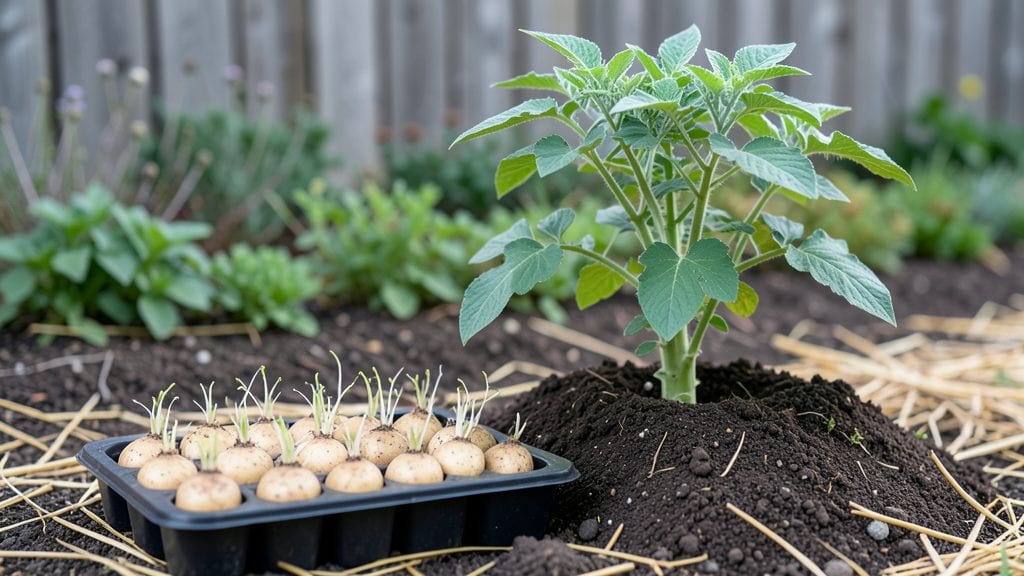
Chitting seed potatoes gives you a 10-14 day head start on the growing season, and I’ve found it’s the difference between a late, struggling crop and one that’s thriving by June. The process is simple—just place whole seed potatoes in a cool, bright spot so they sprout before planting.
Most gardeners skip this step, but I’ve never gone back since seeing my chitted potatoes push out sturdy, 2-inch sprouts ready to hit the ground running.
You’ll need just three things: seed potatoes (certified disease-free), a tray or egg carton, and a location with 50-60°F temperatures and indirect light. Store them in a dark place for the first week to encourage even sprouting, then move them to light to prevent leggy growth.
The whole process takes about 4-6 weeks before planting, and it works for both early and late varieties.
When you plant chitted potatoes, you’ll notice they establish roots twice as fast, meaning stronger plants that resist disease and produce more tubers. The sprouts act like little anchors, holding the soil better in wind or rain.
Plus, you can plant later in the season without worrying about cold soil slowing them down.
This method works for all gardeners—whether you’re planting in raised beds, containers, or directly in the ground. Just avoid chitting too early (sprouts can weaken if stored too long), and never plant potatoes that’ve started to rot or shrivel. Ready to give your potatoes the jumpstart they deserve?
📚 In This Guide
- What you need
- Instructions
- Tips and common mistakes
- Wrapping up and next steps
What you need
- ● Seed potatoes: 1–2 lbs (or ~4–8 medium-sized potatoes) of certified disease-free seed potatoes (e.g., Yukon Gold, Red Pontiac, or Fingerlings). Look for organic or non-GMO varieties if preferred.
- ○ Egg cartons or seed trays: 1–2 cartons (12–24 cups) or a shallow tray with drainage holes. Optional: Use recycled containers with holes punched in the bottom.
- ● Potting soil or peat moss: 1–2 bags of lightweight, well-draining soil mix (avoid garden soil—it can compact and hinder sprouting).
- ● Watering can or spray bottle: A gentle spray bottle works best to avoid disturbing the potatoes.
- ● Scissors or knife: For cutting larger seed potatoes (if needed) into 2–3 oz pieces, each with at least 2–3 eyes (buds).
- ● Bright, indirect light source: A sunny windowsill (east or west-facing) or a grow light (12–16 hours/day).
- ● Labeling tags or markers: To track potato varieties and planting dates.
- ● Humidity dome or plastic wrap: To create a mini greenhouse effect and retain moisture during chitting.
- ● Thermometer: To monitor soil temperature (ideal range: 50–60°F for chitting).
- ● Fertilizer (balanced, low-nitrogen): A pinch of compost or organic fertilizer (e.g., 5-5-5) to boost early growth.
- ● Garden gloves: For handling soil and potatoes comfortably.
- ● Planting calendar: To time your outdoor planting for peak growing conditions in your zone.
Instructions for chitting seed potatoes to jumpstart your garden
Here's how to get a head start on your growing season with this simple, foolproof method.
Select and Prepare Your Seed Potatoes
Start with certified disease-free seed potatoes—these are specifically bred for planting and won’t carry blight or other diseases. Choose medium-sized tubers with 2-3 small buds (eyes) each. These buds are where your sprouts will emerge, so pick potatoes with healthy, firm buds rather than soft or shriveled ones.
Place the potatoes in a cool, dark spot like a pantry or basement for 2-3 weeks before chitting. This period lets the buds wake up and begin growing tiny shoots. If you skip this step, your potatoes might sprout unevenly or too late in the season. I like to store them in a cardboard box with a little peat moss to keep them from drying out.
Set Up Your Chitting Container
Use a bright, cool location—like a sunny windowsill or under grow lights—to encourage even sprouting. A glass jar, plastic container, or even an egg carton works perfectly for holding the potatoes upright. The key is keeping them stable so the sprouts grow straight and strong.
Fill your container with lukewarm water—about 2 inches deep—and place the potatoes inside so the buds are just above the waterline. The water should cover about half the potato, but never fully submerge it. This keeps the tuber hydrated while allowing the buds to access air and light. Change the water every 2-3 days to prevent rot and keep it fresh.
Monitor and Maintain the Chitting Process
Within 2-4 weeks, you’ll see green sprouts emerging from the buds. These are your first sign of success! Keep the container in the same bright spot, but avoid direct sunlight—it can cause the sprouts to turn green and bitter. If the sprouts grow longer than 3-4 inches, they’ll be more fragile when planting, so trim them back to 1-2 inches to encourage sturdy growth.
Check the water level daily—it evaporates quickly, especially in warm rooms. If the potatoes start to dry out, the sprouts may stop growing or even die. A damp paper towel wrapped around the base can help maintain moisture if the water level drops too fast. Once the sprouts reach 1-2 inches, your potatoes are ready for planting.
Plant Your Chitted Potatoes for Faster Growth
Plant your chitted potatoes 2-3 weeks before your last frost date—this gives the sprouts time to establish roots before the ground freezes. Dig a trench 4-6 inches deep and space the potatoes 12 inches apart in rows 3 feet apart. Place them eyes-up so the sprouts point toward the sky—this ensures they grow straight and strong.
Cover the potatoes with 2-3 inches of soil, leaving the sprouts exposed. As the plants grow, gently mound soil around the stems to encourage deeper root development. Water lightly after planting to settle the soil, but avoid overwatering—chitted potatoes are sensitive to rot if the soil stays too soggy. In 4-6 weeks, you’ll see vigorous growth, and your garden will be well ahead of the season!
Tips & tricks for perfect chitted seed potatoes
A few simple strategies will help you maximize your chitting success and get those potatoes in the ground faster than ever.
Selection Matters: When choosing certified disease-free seed potatoes, look for tubers with at least 2-3 healthy buds that feel firm to the touch. I've learned the hard way that soft or shriveled buds often lead to weak sprouts. Store your selected potatoes in a cardboard box with a little peat moss to maintain moisture during the initial 2-3 week dark period.
Container Stability: The key to straight, strong sprouts is stability. Use a container that holds potatoes upright—glass jars or plastic containers work best. I've found that egg cartons can actually work too, but they require more frequent monitoring to keep them from tipping. Once your potatoes are in place, maintain that 2-inch water level and check it daily, especially in warm rooms where evaporation happens quickly.
Light Management: After the initial 2-4 weeks in bright, indirect light, be careful not to expose your sprouts to direct sunlight. I've seen beautiful green sprouts turn bitter and stunted when left in harsh sunlight. If you notice your sprouts growing longer than 3-4 inches, trim them back to 1-2 inches to encourage sturdy growth. This simple step makes all the difference when it comes to transplanting time.
Planting Timing: The 2-3 week window before your last frost date is crucial. I always check my local frost calendar and mark that date on my calendar with a big red circle. Planting too early can expose your delicate sprouts to cold damage, while planting too late means you miss out on that early harvest advantage. When you're ready to plant, make sure to mound soil around the stems as they grow—this encourages deeper root development and stronger plants.
Pro Tips for Chitted Seed Potatoes
- A few simple strategies will help you maximize your chitting success and get those potatoes in the ground faster than ever.
- Selection Matters: When choosing certified disease-free seed potatoes, look for tubers with at least 2-3 healthy buds that feel firm to the touch.
- Container Stability: The key to straight, strong sprouts is stability.
Frequently asked questions
Got questions about chitting seed potatoes?
You’re not alone! Here are answers to the most common ones to help you get started with confidence.
What does "chitting" mean, and why should I do it?
Chitting is the process of encouraging seed potatoes to sprout before planting. It gives you a head start on the growing season, especially in cooler climates. Sprouted potatoes (chits) grow faster and produce stronger plants, meaning earlier harvests and healthier yields!
How long does it take for potatoes to chit?
With proper conditions (cool, dark, and humid), you’ll see tiny sprouts (chits) in 2–4 weeks. Keep them in a bright, frost-free spot (like a sunny windowsill) once sprouts appear to prevent them from growing too long before planting. Patience pays off—wait until chits are 1–2 inches long for best results!
Can I plant chitted potatoes too early?
Yes! Chitted potatoes can handle earlier planting (as soon as soil is workable, ~4–6 weeks before last frost). However, avoid planting if nighttime temps dip below 40°F (4°C)—young sprouts can get frost damage. A quick fix: cover them with row fabric or mulch until the ground warms up.
What if my potatoes don’t sprout after chitting?
Don’t worry—it’s not uncommon! Check for dryness (mist them weekly) or rot (remove any mushy potatoes). If they’re still dormant, try moving them to a slightly warmer spot (60–70°F / 15–21°C) for 1–2 weeks. If all else fails, plant them anyway—they’ll still grow, just slower.
Are there alternatives to chitting for faster growth?
If chitting isn’t your style, try these shortcuts:
- Pre-warm soil: Use black plastic mulch 2 weeks before planting to raise soil temps.
- Plant deeper: Bury chitted potatoes 4–6 inches deep to protect sprouts from frost.
- Choose early varieties: Some potatoes (like ‘Yukon Gold’) sprout faster naturally.
Wrapping up and next steps
Growing your own potatoes from chitted seed potatoes is a rewarding way to ensure a bountiful harvest—especially when you skip the guesswork with pre-sprouted tubers! 🌱 By following the right steps, you’ll enjoy faster growth, healthier plants, and a head start on the gardening season.
Whether you’re a beginner or a seasoned green thumb, this method makes planting easier and more efficient.
Ready to take the next step? Grab your chitted potatoes, mark your calendar, and plant them at the perfect time—your future harvest (and your dinner plate!) will thank you. Happy gardening! 🌿