Transplanting
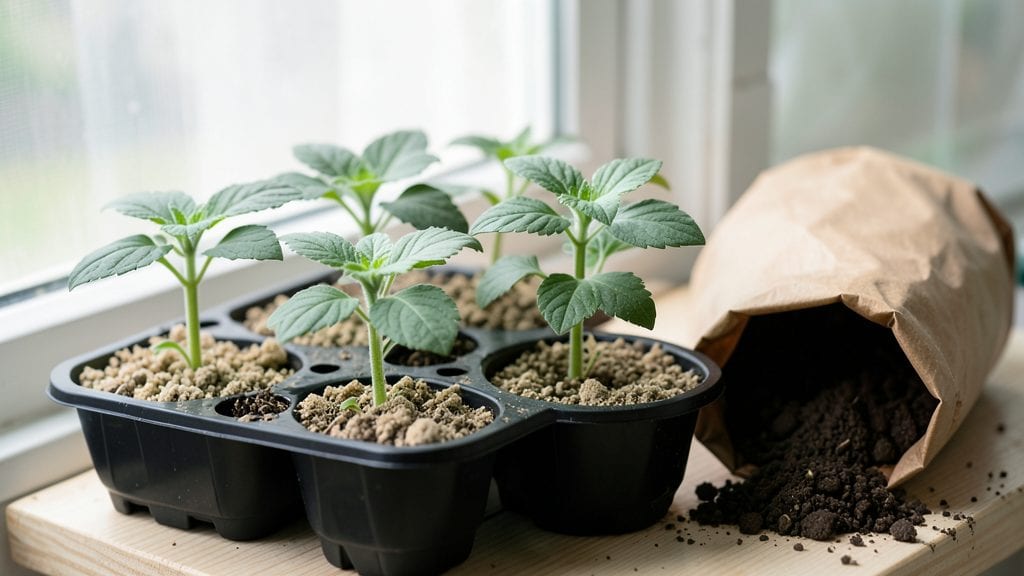
Seeing zinnia seedlings pictures of each growth stage turns uncertainty into clarity—those delicate sprouts may seem unremarkable, but every shift, from cotyledons to true leaves, reveals exactly what your plants crave next. ✨ I’ve watched hundreds of zinnia seedlings grow, and I’ll show you what healthy progress looks like at every step so you never miss a critical window.
You’ll recognize the early stages by their round, fleshy leaves—those are the cotyledons, the seedlings’ first true meal ticket. Within a week, you’ll spot the first true leaves, which look different (narrower, more pointed) and signal it’s time to move seedlings into brighter light.
Too little light here means leggy, weak plants that’ll never reach their full height. The right light keeps stems sturdy and leaves vibrant.
By the time you see the third set of true leaves, your seedlings are ready for transplanting—if you’ve been hardening them off. That’s when they start looking like miniature versions of the bold blooms you’ll see later.
The key is consistency: water just enough to keep soil moist, never soggy, and watch as those stems thicken and leaves fill out.
Whether you’re growing zinnias from seed in flats or individual pots, these milestones apply. The pictures will show you exactly what to watch for, so you can adjust care before problems start. Let’s get growing—and keep those seedlings on track for showstopping blooms.
📚 In This Guide
- What you need
- Instructions
- Tips and common mistakes
- Wrapping up and next steps
What you need
- ● Zinnia seeds: Choose heirloom or hybrid varieties (e.g., 'Benary’s Giant' or 'Profusion'). Aim for 50–100 seeds for a small garden or 200+ for bulk planting.
- ● Seed-starting trays or pots: 2–4 inch deep with drainage holes. Use 12–24 cell packs for precision or 4–6" pots for fewer seedlings.
- ● Seed-starting mix: Lightweight, sterile peat-based or coconut coir blend (avoid garden soil—it’s too dense!). 1–2 bags (5–10 quarts) should suffice.
- ● Grow lights or sunny windowsill: 12–16 hours/day of light (south-facing window or LED grow lights 6–12" above seedlings).
- ● Misting bottle or spray nozzle: For gentle watering (avoid soaking the mix!).
- ● Plastic wrap or humidity dome: Keeps moisture in until germination (2–3 weeks).
- ● Fertilizer: Balanced liquid fertilizer (e.g., 5-5-5 or 10-10-10) diluted to half-strength for young seedlings.
- ● Small hand trowel or spoon: For transplanting seedlings later.
- ● Heating mat: Speeds up germination in cooler climates (70–75°F ideal).
- ● pH test kit: Zinnias prefer 6.0–7.0 pH—adjust mix if needed.
- ● Label markers: Track varieties (especially if mixing colors!).
- ● Compost or worm castings: Boosts nutrients after germination.
- ● Camera or phone: Capture those adorable early stages for your "zinnia seedlings pictures" collection! 📸
How to identify zinnia seedling stages through visual milestones
Watch your zinnias transform from tiny sprouts to vibrant blooms by recognizing these key growth stages.
🌱 Step 1: Recognize Germination and First True Leaves
Germination begins 5-14 days after sowing, depending on temperature. You'll see tiny green hooks break through the soil—these are the first leaves, called cotyledons. They're round and plump, storing energy for the plant. Don't be tempted to water heavily yet; just keep the soil lightly moist.
True leaves appear next, 7-10 days later. These look different from cotyledons—they're narrower, more pointed, and arranged alternately along the stem. This is your signal to start providing bright light (12+ hours daily) to prevent leggy growth. Watch for the first pair of true leaves to appear before thinning seedlings if you planted multiple seeds per pot.
🌿 Step 2: Identify the 2-4 Leaf Stage for Transplanting
When seedlings reach 2-4 true leaves, they're ready for their first big move—either into individual pots or a seedling tray. Look for sturdy stems and vibrant green leaves; these plants have enough energy to handle transplant shock. Handle seedlings by their leaves, not stems, to avoid damage.
At this stage, you'll notice the first signs of zinnia's characteristic growth habit. The leaves may start developing a slight fuzzy texture, and the stems will thicken noticeably. This is when I begin hardening off seedlings if moving them outdoors—start with 1-2 hours of sunlight daily and gradually increase exposure over 7-10 days.
☀️ Step 3: Spot the 4-6 Leaf Stage and Flower Bud Formation
The 4-6 leaf stage marks a turning point—your seedlings are now small plants with real character. Look for the first signs of flower buds forming at the stem's base. These buds appear as tiny green bumps between the leaves. This is when I add a balanced fertilizer (half-strength) to encourage strong root and flower development.
You'll also notice the leaves developing more pronounced veins and a slightly waxy coating. The stems become noticeably sturdier, and the plant starts looking more like the mature zinnias you envision. This is the perfect time to begin spacing plants 6-12 inches apart if you're transplanting them into the garden.
⏰ Step 4: Watch for the First True Flower Buds
The most exciting milestone arrives when you see the first true flower buds—they appear as small, rounded bumps that gradually elongate. These buds will eventually open into the colorful blooms zinnias are famous for. You'll notice the central stem starts developing a more woody texture, and side shoots may begin forming.
At this stage, I start monitoring watering closely—zinnias need consistent moisture but hate soggy roots. Water at the base in the morning to allow leaves to dry before evening. You'll see the first blooms appear 60-70 days after sowing, depending on variety. The first flowers often open at the base of the plant and work their way up the stem.
✂️ Step 5: Identify Mature Growth and Harvest Readiness
Mature zinnia seedlings show several key characteristics: multiple side shoots, fully opened blooms, and woody stems. The leaves at this stage are large, deeply veined, and typically 3-6 inches long. You'll notice the plant develops a bushy, multi-stemmed habit rather than remaining a single stalk.
This is when you'll want to start harvesting spent blooms to encourage continuous flowering. Watch for flowers that begin to droop or develop brown edges—these are ready for cutting. The stems at this stage are strong enough to support 12-18 inch tall blooms, depending on variety. Regular deadheading promotes more blooms and prevents the plant from going to seed prematurely.
Tips & tricks for perfect zinnia seedling growth
Here's what I've learned from years of growing zinnias—these simple tricks will help you spot each growth stage like a pro.
Lighting Secret: During Step 1, when cotyledons appear, place your seedlings under a grow light if natural light is limited. I use a simple LED bulb just 6 inches above the seedlings for 12+ hours daily. This prevents leggy growth before true leaves even emerge. The key is keeping the light intensity bright but not scorching—you should be able to hold your hand under it for 30 seconds without discomfort.
Transplanting Timing: In Step 2, when you're ready to move seedlings to individual pots, I recommend doing it in the late afternoon. This gives plants a few hours to recover before nightfall. Handle them by the leaves (never the stems!) and water thoroughly after transplanting. The 2-4 leaf stage is critical—waiting too long makes roots circle in the pot, while moving too early stresses delicate plants.
Flower Bud Care: When you spot those first tiny flower buds in Step 4, reduce watering slightly to prevent bud rot. I water at the base in the morning only, using about ½ cup per plant. The buds will develop a slight waxy coating as they mature—this is normal and indicates healthy growth. Watch for the central stem to develop a woody texture; this is your signal that the plant is ready for full outdoor exposure.
Harvesting Hack: For Step 5, I always harvest blooms in the morning when stems are most hydrated. Use clean, sharp scissors to cut just above a leaf node, and remove any spent blooms immediately. This encourages more flowers to develop. The stems should support 12-18 inch blooms without sagging—if they're too weak, add a small stake for support.
Pro Tips for Zinnia Seedlings Pictures
- Here's what I've learned from years of growing zinnias—these simple tricks will help you spot each growth stage like a pro.
- Lighting Secret: During Step 1, when cotyledons appear, place your seedlings under a grow light if natural light is limited.
- Transplanting Timing: In Step 2, when you're ready to move seedlings to individual pots, I recommend doing it in the late afternoon.
Frequently asked questions
Got questions about zinnia seedlings? You’re not alone!
Here are answers to the most common queries—from timing to troubleshooting—to help you grow vibrant zinnias with confidence.
How long does it take for zinnia seedlings to sprout?
Zinnia seeds typically sprout within 5 to 14 days after planting, depending on soil warmth and moisture. Keep the soil consistently moist (not soggy) and place trays in a warm spot (around 70°F) for faster germination. Patience is key—some varieties may take longer!
When is the best time to transplant zinnia seedlings outdoors?
Wait until after the last frost and when nighttime temperatures stay above 50°F (10°C). Seedlings should be 3 to 4 inches tall with 2-3 sets of true leaves before transplanting. Harden them off for 5-7 days by gradually exposing them to outdoor conditions to avoid shock.
What should zinnia seedlings look like at each growth stage?
Check out our stage-by-stage pictures for visual cues, but here’s a quick breakdown:
- Germination: Tiny white roots, then a single spiky seed leaf (cotyledon).
- Early seedling: 1-2 inches tall with 2-3 round true leaves (not jagged like cotyledons).
- Transplant-ready: Bushy with 4+ leaves and a sturdy stem.
Why are my zinnia seedlings dying or turning yellow?
Yellowing leaves or wilting often signal overwatering, poor drainage, or disease. Check for:
- Root rot: Keep soil lightly moist (not drenched) and use pots with drainage holes.
- Cold stress: Zinnias hate frost—keep them indoors or under grow lights until warm.
- Pests: Inspect for aphids or fungus gnats; treat with neem oil if needed.
Can I grow zinnias from seed instead of seedlings?
Direct-sow seeds after frost into warm soil (60°F+), pressing them ¼ inch deep. Thin seedlings to 12-18 inches apart for full blooms. While seedlings give you a head start, seeds are cheaper and just as easy for beginners!
Pro Tip:
For bigger blooms, pinch off the first set of flowers when seedlings are 6-8 inches tall. This redirects energy to root and stem growth, leading to taller, bushier plants with more vibrant flowers later in the season.
Wrapping up and next steps
Watching your zinnia seedlings grow from tiny sprouts to vibrant blooms is one of the most rewarding parts of gardening! 🌱 From those first cotyledons to full, colorful flowers, each stage is a testament to your care and patience.
Whether you’re a seasoned gardener or just starting, these growth milestones remind us that great things take time—and your green thumb is already making a difference.
Now that you’ve got the know-how, it’s time to roll up your sleeves! 🛠️ Ready to transplant your seedlings into the garden? Start by choosing the right spot—full sun and well-draining soil are key—and give them the love they deserve. Happy gardening!