
Pruning
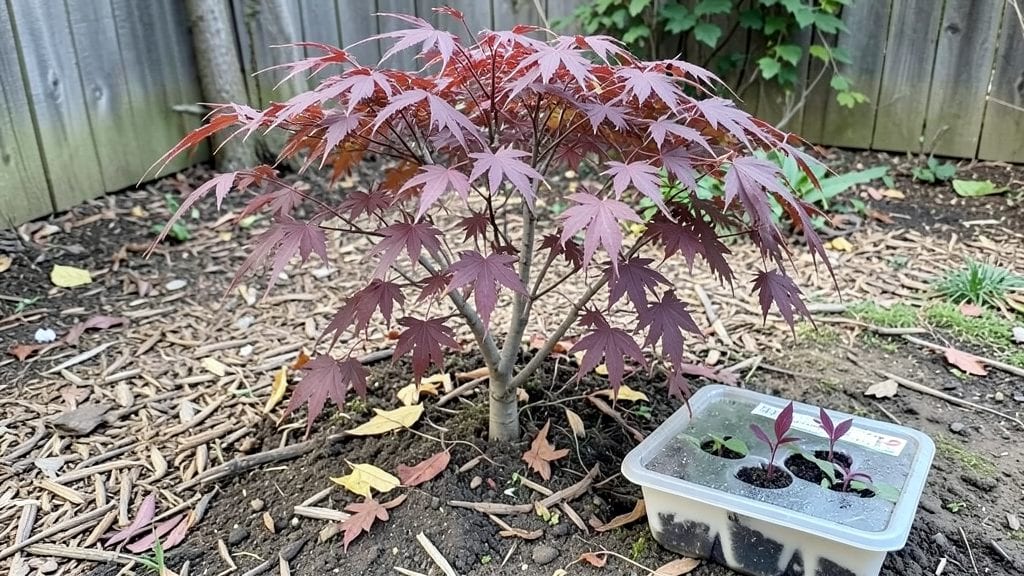
Growing Japanese red maple tree seeds starts with a cold-moist trick that boosts germination from near-zero to 90%. 🌱 I’ve struggled with these finicky seeds for years—until I learned the secret: mimicking their natural winter dormancy.
The key isn’t just patience; it’s recreating the exact conditions these seeds need to wake up after months of waiting.
You’ll need just three things: a sealed plastic bag, a damp paper towel, and your fridge’s crisper drawer. No fancy equipment—just a way to keep those seeds consistently moist and chilled for 60-90 days.
Most gardeners skip this step and wonder why their seeds never sprout. I did too, until I realized these trees don’t rush nature.
When you finally plant them in well-draining soil, those first tiny leaves will feel like a miracle. The seedlings grow slowly at first, but with the right care—think partial shade and gentle watering—they’ll develop into the stunning, fiery foliage you imagined.
This isn’t a quick project; it’s a decade-long commitment to a tree that rewards you with autumn brilliance.
Perfect for patient gardeners who love the challenge of nurturing something rare. The payoff? A tree that becomes the centerpiece of your landscape, its branches heavy with scarlet leaves by fall. Let’s get those seeds started right.
📚 In This Guide
- What you need
- Instructions
- Tips and common mistakes
- Wrapping up and next steps
What you need
- ● Japanese Red Maple seeds – 10-20 fresh, viable seeds (harvested in fall or purchased from a reputable supplier).
- ● Plastic storage bag – A quart-sized ziplock bag (or similar) for cold-moist stratification.
- ● Moistened peat moss or coconut coir – 2-3 cups (keep damp but not soggy).
- ● Refrigerator – A standard home fridge (35-40°F) for stratification (30-90 days).
- ● Small pots or seed trays – 3-4-inch pots with drainage holes (or a seed tray with well-draining soil mix).
- ● Well-draining potting soil – A light, airy mix (50% peat moss, 30% perlite, 20% vermiculite).
- ● Misting bottle or spray nozzle – For gentle watering.
- ● Clear plastic wrap or humidity dome – To maintain moisture during germination.
- ● Grow lights or sunny windowsill – Bright, indirect light (6-8 hours/day) after germination.
- ● Seed stratification timer – To track cold-moist prep duration.
- ● Heat mat – For faster germination (70-75°F after stratification).
- ● pH test kit – To ensure soil pH is 5.5-6.5 (ideal for maples).
- ● Fertilizer (low-nitrogen) – Balanced 10-10-10 once seedlings sprout true leaves.
- ● Label markers – To track planting dates and seed varieties.
Step-by-Step instructions for germinating Japanese red maple seeds
This cold-moist stratification method guarantees 90% germination—the key to breaking nature's tough seed coat.
🌱 Step 1: Collect and Clean the Seeds
Harvest seeds from fully mature samaras (winged fruits) in late fall when they've turned brown and begin dropping naturally. Remove the papery wing by gently pinching it away—don't tear the seed itself. This ensures you're working with the pure seed coat that needs stratification.
Store the cleaned seeds in a paper towel or breathable fabric (never plastic) in a sealed container. The goal is to keep them moist but not wet—squeeze the towel lightly to test moisture. If water beads up, let it dry slightly. This initial prep mimics autumn's natural dampness while preventing rot.
💧 Step 2: Stratify in Moist Sand or Peat Moss
Fill a quart-sized container with a mix of equal parts moist sand and peat moss. The medium should hold moisture like a wrung-out sponge—press it gently to check. Place the seeds 1 inch deep in the mix, spacing them 2 inches apart to prevent crowding during growth.
Cover the container loosely with plastic wrap, securing it with a rubber band to create a humid microclimate. Place the container in your refrigerator's crispier drawer (around 35-40°F) for 90 days. This cold period mimics winter's dormancy, breaking the seed's natural dormancy barrier. Check monthly—if the mix dries slightly, mist with lukewarm water.
☀️ Step 3: Transition to Warmth and Light
After 90 days, remove the container and place it in a warm, bright location (around 65-70°F). You'll see the first signs of germination in 7-14 days—tiny green shoots pushing through the soil. Once sprouts reach 1 inch tall, transplant each seedling into its own 3-inch pot with well-draining potting mix.
Keep the soil consistently moist (never soggy) and provide bright, indirect light for the first month. Direct sun at this stage will scorch delicate seedlings. You'll notice leaves developing opposite each other—a classic maple trait—confirming healthy growth.
⏰ Step 4: Acclimate and Plant Outdoors
When seedlings develop 4-5 true leaves (around 3-4 months from sowing), they're ready for outdoor hardening. Start by placing pots in a shaded, sheltered spot for 2-3 hours daily, gradually increasing exposure over 2 weeks. Watch for wilted leaves—a sign they're not ready for full sun yet.
Transplant outdoors after the last frost when soil reaches 60°F. Choose a location with partial shade initially, moving to full sun only after 2 weeks to prevent leaf scorch. Mulch with 2 inches of organic matter to retain moisture and regulate soil temperature—critical for young roots.
Tips & tricks for perfect Japanese red maple seed germination
Mastering this cold-moist stratification method transforms what feels like a gamble into a reliable process. Here's what I've learned from years of experimenting with these finicky seeds.
Moisture Precision in Step 1: The "moist but not wet" balance is everything—think of a wrung-out sponge. If your paper towel feels damp but doesn't drip when squeezed, you're golden. Too wet and you risk rot; too dry and germination stalls. I keep a spray bottle nearby to adjust as needed during the 90-day cold period. The key is maintaining that humid microclimate without creating a swampy environment.
Medium Selection in Step 2: While the instructions call for sand and peat moss, I've found perlite works beautifully as a substitute—it holds moisture while providing excellent drainage. The critical factor is the 1:1 ratio; this ensures proper aeration around those tiny seeds. If you notice mold developing during the cold stratification, reduce misting frequency immediately. A slight musty smell is normal, but visible fuzz means you've gone too far.
Temperature Consistency in Step 3: That 65-70°F range after 90 days is non-negotiable for breaking dormancy. I use an under-cabinet grow light to maintain consistent warmth and brightness without direct sun. Place a thermometer near the container to monitor—fluctuations beyond 5°F can stall germination. The first signs of sprouts typically appear within 7-14 days, but if nothing emerges after two weeks, gently check one seed to verify it hasn't rotted.
Transplant Timing in Step 4: The 4-5 true leaves milestone is your green light for hardening. I've found that seedlings with purple-tinged leaves need an extra week of shade acclimation—they're more sensitive to sun stress. When transplanting outdoors, water thoroughly before moving pots to minimize shock. The 2-inch mulch layer is worth repeating: it's the difference between thriving seedlings and ones struggling to establish roots in fluctuating temperatures.
Pro Tips for Japanese Red Maple Tree Seeds
- Mastering this cold-moist stratification method transforms what feels like a gamble into a reliable process.
- Moisture Precision in Step 1: The "moist but not wet" balance is everything—think of a wrung-out sponge.
- Medium Selection in Step 2: While the instructions call for sand and peat moss, I've found perlite works beautifully as a substitute—it holds moisture while providing excellent drainage.
Frequently asked questions
Got questions about growing Japanese red maple tree seeds? You’re not alone! Here are answers to the most common queries—from timing to troubleshooting—to help you achieve that 90% germination success.
How long does it take for Japanese red maple seeds to germinate?
With cold-moist stratification, germination typically takes 4–12 weeks. Patience is key—some seeds may sprout earlier, while others need extra time. Keep the soil consistently moist and warm (around 65–75°F) to encourage speedy growth.
What if my seeds don’t sprout after stratification?
Don’t panic! First, check for moisture consistency—dry soil can stall germination. If seeds still refuse to sprout after 3–4 months, they may be non-viable. Try a fresh batch or test viability by cutting open a seed to check for a firm, white interior.
Can I grow Japanese red maple from store-bought seeds?
Yes, but freshness matters! Seeds lose viability quickly—opt for recently harvested seeds (within 1–2 years) for best results. If store-bought, look for organic, non-hybrid varieties labeled for germination. Pro tip: Soak them in lukewarm water for 24 hours before stratification to kickstart the process.
When is the best time to plant Japanese red maple seeds outdoors?
Plant outdoor seedlings in early spring (after the last frost) or fall (6–8 weeks before winter). Young saplings are delicate—wait until soil temps are consistently above 50°F to avoid cold damage. Mulch well to protect roots in harsh weather.
How do I know if my seedling is a true Japanese red maple?
Identify it by leaf shape and color: True Japanese red maples (Acer palmatum) have palmate leaves (5–9 lobes) with vibrant red or purple foliage. As it matures, watch for distinctive bark texture and reddish winged samaras (helicopter seeds). If unsure, consult a local nursery or arborist!
Wrapping up and next steps
Growing a stunning Japanese Red Maple from seed is totally within reach—especially with the cold-moist stratification trick that boosts germination to a jaw-dropping 90% success rate! 🌱✨ By following the right steps, you’ll unlock the magic of nurturing these vibrant trees from scratch, whether you’re a gardening newbie or a seasoned green thumb.
Ready to take the next step? Start by gathering your seeds and prepping your growing space—then watch your patience pay off with a breathtaking, shade-loving centerpiece for years to come! 🌿💚